![]()
This allows you to process a payrun. It covers:—
- Entering the pay information for each employee;
- Printing the pay run reports and pay slips; and
- Finalising the pay run to update all data files.
Add/Edit Pay Amounts
If you have established standard pays for any employees, when the current payrun is empty you will be given the option to load the standard pays.
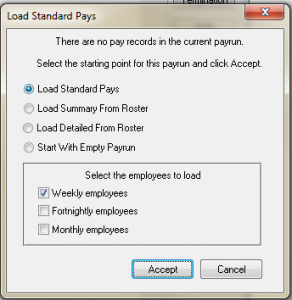
Once you have entered a pay transaction this screen will not appear again until you finalise and start the next payrun. However you can load each individual standard pay at any time.
Select the employee, using, if necessary, the Easysearch keys. If the entered code is not on file, you can use the Easysearch window to add the employee immediately, or re-enter the code.
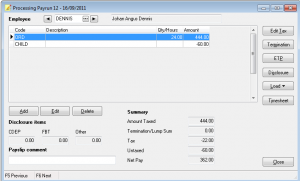
This is PayTek’s main data entry screen.
A reminder of the employees birthday or anniversary (of commencement) will appear in red at the bottom of the screen for the month before the date. This allows you to edit their accruals if they change (such as sick leave which usually increases from 5 to 8 days after one year) or their pay rates which may change on birthdays for junior staff.
| Add/Edit/Delete | This option is used to add a Pay Item to the employee’s pay.
Enter a Pay Item code, using, if necessary the F2 Easysearch to locate the code. If the code is not on file, you have the option to add it to the file before continuing. |
| Enter either the hours or amount depending on how the pay item was set up. Deductions need to be entered as negative amounts. If the pay item is a percentage, then the calculated amount will appear, but it can be edited if necessary.
Enter a comment for this pay item. This comment appears on the employee’s payslip against this pay item. Note that it is possible to process a negative pay amount for an employee. This is to permit corrections to be made. However, numerous warnings will be displayed to alert you to the fact that the employee’s pay is negative, in order to minimise the possibility of this happening in error. |
|
| Edit tax | This allows the user to override the calculated tax. You can either:–
¨ New tax amount – edit the actual tax amount ¨ Average the tax – average the tax over a nominated period. If you select this option, enter the amount to average and a period over which the amount is to be averaged. This is normally used to average the tax over a number of weeks if you are paying an employee annual leave in advance. ¨ Tax a bonus payment – calculate the tax on a bonus payment. This averages the tax amount on a bonus payment in accordance with ATO guidelines. |
Example — Tax averagingAssume an employee has earned $500 ordinary pay, $100 overtime and is to be paid $1,000 annual leave covering 2 weeks. You would enter $1,500 as the amount to average (the overtime will be taxed in the current week) and 3 weeks as the period to average that amount over (i.e. the current week just worked plus the next 2 weeks on leave). PayTek will then average the tax over 3 weeks. |
|
| Termination | This option is used to enter a termination payment or a lump sum E payment for certain back-pay amounts.
The termination payment should be broken up into the various lump sum components. Taxable amounts will be calculated at the special rate applicable to termination amounts. If the termination pay includes an amount for unused annual leave etc, you need to enter the employee’s normal pay. This is used by PayTek to calculate the tax instalment in accordance with Australian Tax Office rules. If you enter a lump sum E amount you can enter the details that will appear on the payment summary. |
| Note that any employee receiving a termination payment will be automatically tagged for deletion by the system when the current pay run is finalised. However, they are not regarded as terminated until a payment summary has been printed for them. | |
| ETP | You can enter an Employment Termination Payment for any salaried employee. When you have entered the details, the payment will be finalised when you finalise that payrun.
Normally only one ETP will be paid to an employee and a special payment summary will be printed for the ETP. (You can edit or delete these payments if necessary from the Setup menu.) This is usually a complex calculation with different elements so consult your accountant if you are unsure of the details. |
| Disclosure | Certain types of non-wage payments must be entered so they can be declared on the annual Payment Summaries. These payments aren’t part of each pay, but still need to be recorded.
For normal employees, there are three categories: CDEP FBT and Other. For non-employees, there is just one: the market value of non-cash benefits. For foreign income employees you can also record the foreign tax paid for payment summary reporting. These special payments are all entered into PayTek as Miscellaneous Payments, by clicking the Disclosure button. Note that the amounts are entered only for record purposes, and will not increase the amount of the current pay. |
| Load | This allows you to load the standard pay for the current employee. If you do this all existing current pay data will be overwritten. You can also load the last processed pay on file for the employee (ie from last week) or the roster details (detailed or summary). |
| Timesheet | This allows you to enter daily timesheet data and PayTek will summarise it onto the employees pay or add a daily entry to the payroll. (See below) |
Click on the video buttons to step forward or backward through the file of employees.
Timesheet data entry
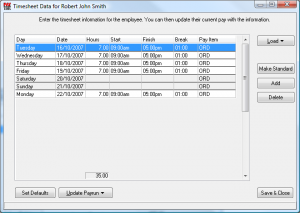
This screen allows you to enter timesheet information for an employee.
Load
The load button allows you to
- Reset the timesheet to the default settings
- Load the last saved timesheet.
- Load the employee’s standard timesheet
Make standard
This updates the standard employee timesheet with the current displayed information. (The dates are calculated relative to the pay period end date when loading the standard timesheet.)
Add
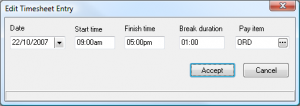
This option adds a new entry to the timesheet.
Enter the date, start time, finish time, break duration (if any) and a pay item for the hours. If there is a public holiday on the entered date it will appear in the status bar at the bottom.
If you have selected the option to enter hours only the daily entry is simplified by asking for the date, hours and pay item only.
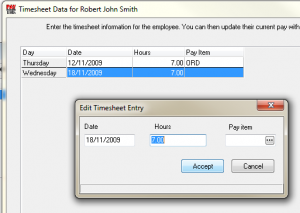
Edit
Double click on a timesheet entry to edit it or press enter to edit the entry.
Delete
Click this button to delete the highlighted entry or press the delete key to immediately delete the entry.
Update Payrun
When finished you can either
- Add Summary to Payrun – This totals the hours for each pay item on the timesheet and adds one entry to the payrun for each.
- Add Details to Payrun– This adds a pay item entry for each line of the timesheet where the hours are not zero.
- Replace Payrun with Details – This will replace any current lines on the payrun allocated to any pay item on the timesheet with the detailed timesheet entries.
- Replace Payrun with Summary – This will replace any current lines on the payrun allocated to any pay item on the timesheet with the summary timesheet entries.
Save and Close
This updates the file and saves the current timesheet information. To abandon the changes click the cross button of the window.
Set Defaults
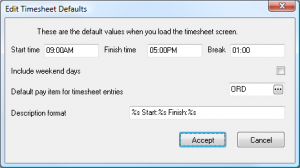
You can adjust the layout of the timesheet entry screen by adding defaults for the screen. If you want to transfer the daily details onto the employee’s payrun you can tailor the description of each line with the description format. Enter any text and use a %s to substitute for the following
Date, start time, finish time, duration of break
To not show these details just leave the format line blank.
Payroll Grid
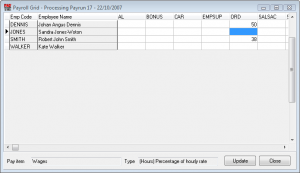
The payroll grid is designed to assist data entry by providing a grid to enter the data for each employee at once. This is ideally suited to entering data for casual employees. Use the grid then use the payroll screen to add any comments required and to check the tax.
Pay run reports
Current Pay Report
This is a summary report of the current pay run. It should be used for checking your data entry, prior to printing pay slips and finalising the pay run. A negative pay will give a warning. In some cases such as processing adjusting payruns this warning may be ignored.
Print Payslips
Payslips are printed with all the information making up employees’ pays as well as year-to-date and accrual details. You can adjust the payslip format but it is suggested that you limit the changes to cosmetic or alignment adjustments.
If you pay employees by cheque you can print a combined cheque and payslip. There is an option to suppress printing payslips for pay-by-cheque employees. This allows you to print cheques/payslips for these employees and a normal payslip for the others.
If you want to email payslips to your employees you can also print payslips for any employees without an email address on file.
The date paid will appear on the payslip and is the date the payment was made as opposed to the end of the pay period. In system setup you can specify how many days after the end of the pay period you normally make the payments. This is used as the default date paid.
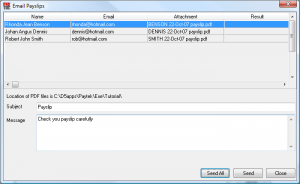
When emailing payslips they are sent as a PDF file attachment to the email message. You can send them all at once, or one at a time.. Check the result column for the status of the sent messages. If the payslip cannot be delivered a failure message will come back to your mail client (ie Outlook express etc)
Print Timesheets
You can print the timesheets for a range of employees.
Coinage Analysis Report
This prints a report providing a coinage analysis for all employees who are paid in cash. Note that any employee whose net pay is not divisible by five cents will generate a warning, and will be excluded from the coinage analysis. You could draw a cheque for these employees or adjust the tax deducted to round the net pay to 5 cents.
Pay-by-Cheque Listing
This prints a report listing the net pay for all employees in the current pay run who are to be paid by cheque.
Bank Transfer Summary
This prints a schedule listing each employee who is paid by bank transfer, showing his or her bank account details along with the net pay amount. It also includes any disbursements from employee deductions.
Create EFT file (ie ABA format)
This allows you to create a special format file, containing all the information for the current payrun for all those employees who are paid by bank transfer. Note that if the employee’s bank account information is incomplete, they will be excluded from the file, as invalid transfer file data can cause the whole batch to be rejected.
It is recommended that you create the file on a floppy disk, as this will make it easier to locate the file when you use your bank software to transmit the file to your bank.
The Bank Transfer Summary provides a summary of the contents of the file for checking.
Finalising the pay run
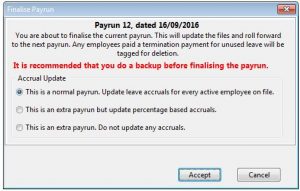
When you are sure that the current pay run data is correct, you should finalise it. Unfinalised pay runs do not appear anywhere in the system, except under the Transactions menu.
Finalise and Post Pay Run.
This option finalises the current pay run, updating all PayTek data files. Payslips and other payrun reports cannot be printed after the pay run has been finalised, (although payslip information is available through the reports menu.)
- This is a normal payrun. Update leave accruals for every active employee on file.
This option is ticked by default. It will cause PayTek to calculate and add leave accrual records for each employee who is an active employee (ie not tagged for deletion). It will ignore any employee who is set to “do not accrue leave” in their masterfile.
If you have a mixture of employees paid monthly or weekly etc, then leave will be accrued on the most frequent period. This means if your pay frequency is weekly, then all employees (including fortnightly and monthly) will be accrued on that basis. For this reason it is important to enter the accrual per period for every employee based on the default frequency.
- This is an extra payrun but update percentage based accruals.
If you are processing a payrun outside of the normal payrun frequency (eg a payrun in the off week of a fortnightly payrun cycle to pay casual employees) you can select this option. PayTek will update any accruals based on the percentage of hours worked or amount earnt in this payrun but will not accrue any fixed hours per period.
- This is an extra payrun. Do not update any accruals.
If the current payrun is an adjusting payrun (this will be an extra payrun) you would normally not update the accruals for anyone.
If an employee is on leave without pay you should tick the “do not accrue leave” box in their masterfile so that they do not accrue leave for the period of unpaid leave.
If you are transferring the pay information to your accounting system you can suppress the transfer (useful if you are reprocessing a payrun to correct an error in which case you should also manually correct the original payrun in your accounting system) and also enter a date for the transactions to appear in your accounting system.
Accounting Interface
If you have the Accounting interface activated, PayTek will export the pay transactions to the nominated file. You should then go to your accounting system and import the payroll transaction file. See your accounting system documentation for details.
CashManager interface notes
PayTek will add the pay cheques to the CashManager file.
PayTek will add the cash pays to the CashManager file as a direct payment transaction. If you draw a cheque for the cash pays, you can change this transaction to a cheque after you have imported the transactions into CashManager.
PayTek will add the EFT transaction to the CashManager file. Because PayTek has to code each pay transaction to the chart of accounts, only one payment per employee is generated. This is because PayTek cannot code the EFT payments if you split an employee’s pay over more than one account.
Note: Finalising a payrun is a one-way process that updates the data files, clears the current payrun and advances the pay period end date.Be sure to make a backup before finalising each pay run. |
For this reason if you have to create an EFT file with this transaction from CashManager you must add the bank account details and split any employee pays made to multiple accounts.